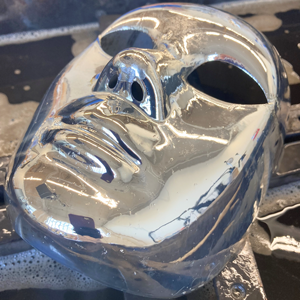
Dipping Chrome

Plastics repel water - water on the surface just beads up and rolls off. One way to get around this problem is to force the silver into complete contact with the base coat by immersing it. This process is based on our 3-D Glass mirror bath technique.
Each step in the spray chrome process – base coat, silver and top coat – is a separate operation. We find you get the best results if you spray on the base and top coats. It is difficult to get a uniform surface by painting them on with a paint brush.
Please read Angel Chrome Starter Kit instructions before you start the dipping process. They contain important information not given here.

Dipping chrome vs spray chrome
- This process uses more distilled water than spraying. Be sure you have an adequate supply on hand before you begin.
- The dipping process uses a more dilute silver solution than spraying - 10 ml per liter for dipping instead of 30 ml per liter for spraying. While it is less efficient than spraying, it is easier to control and often less frustrating.
- You can silver several pieces in the tub at one time but you cannot use the silvering solutions more than once.
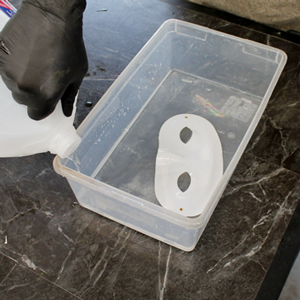
Buy or make a large, clean plastic tub
For this process you need a clean plastic tub that is just large enough to hold the piece and allow the chemicals to be sloshed over it. You can use a clean plastic storage container or make a wooden box and line it with a continuous sheet of sturdy plastic. The process is based on our 3-D Glass technique.
Scrub the tub with Dawn Cleaner for Basecoat and rinse with distilled water before using. Any dust, dirt or tap water in the tub will interfere with the silvering process.
Prepare the silver chemicals
- Add 10 ml of Angel Chrome Silver Solution to 1000 ml (1 liter) of distilled water.
- Add 10 ml of Angel Chrome Reducer to 1000 ml (1 liter) of distilled water.
- Do NOT mix the Silver and Reducer together. This happens later in the process.
Prepare the piece
- Clean the piece on all sides with Dawn Cleaner and rinse with distilled water.
- Spray on enough Prep Coatto cover the surface completely.
- Spray a generous layer of Tin Activator on top of the Prep Coat.
- Allow the Prep Coat/ Tin Activator mix to sit on the piece for 30 to 40 seconds.
- Rinse the entire piece thoroughly with distilled water. You can hold the piece in clean gloved hands without harming the sensitizing or silver layers.
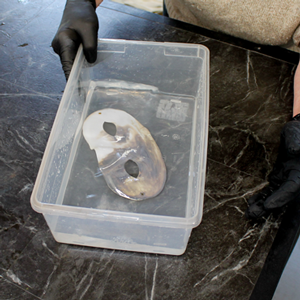
Silver the piece
- Pour the diluted Silver Solution Silver Solution into your silvering tub.
- Place your prepared piece to the tub.
- Pour the diluted Silver Reducer into one corner of the tub – do not pour it directly on top of the piece.
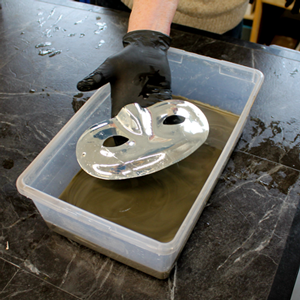
- Slosh the tub to mix the Silver and Reducer and allow the mix to run all over the piece. The mixed Silver and Reducer chemicals will stay clear, then turn dark and then turn muddy gray. The process takes 30 to 60 seconds depending on the ambient temperature.
- Remove your piece when the chemicals begin to turn muddy gray. Leaving it in longer will dull the silver.
- Rinse the piece thoroughly with distilled water.
- Let it dry completely and then top coat it.
Fixing a mistake
If you are not happy with the silver coat, you can always clean it off with Silver Remover, rinse it 2 or 3 times with distilled water and re-silver it.