Re-Silvering Old Mirrors
A mirror, in its most basic form, is a piece of glass coated with silver and protected with backing paint.
The silver coating is not paint - it is a very thin layer of pure elemental silver that forms directly on the glass as the silver chemicals react with each other.
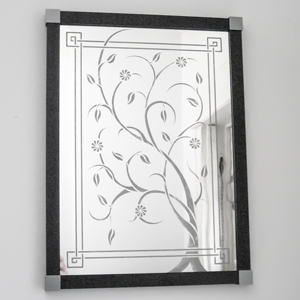
This video shows you how to re-silver a beveled bathroom mirror using our Mini Silver Kit. The photo above is an old engraved mirror that has been re-silvered using this process.
To silver and re-silver telescopes, sextants and other scientific mirrors see our page on scientific instruments.
When to re-silver an old mirror
If the glass is beveled, curved, beautifully engraved, carefully shaped or has sentimental value, it is certainly worth re-silvering.
Mirroring (re-silvering) is a very wet process. In order to re-silver a mirror, you will have to remove it from its frame. This is a good time to see if the frame itself needs to be strengthened or repaired. The best time to do this is after you have carefully removed the mirror.
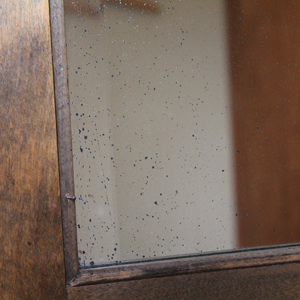
Re-silvering a mirror does not affect the glass itself. It will not fix any scratches, chips or cracks. In fact, the bright new silver could make these defects more noticeable. If your mirror is scratched, look carefully to see if the scratch is in the glass or the silver. It is not possible to polish a scratch out of the glass by hand but re-silvering will remove scratches, black spots and detached silver in the silver layer. You will get better results if you silver the entire mirror. As we outline below, it is usually not a good idea to try to re-silver just a small section of your mirror.
For this process you will need a Pump Spray Silver Kit, a Sheet Glass Silver Kit or a Mini Silver Kit and extra fine pumice. For mirrors larger than 8 sqaure feet, we suggest a Pump Spray SIlver Kit.

Best products to re-silver your mirror
We have a wide selection of kits and individual products to offer. The kit you choose depends on the size and shape of your mirror. The most popular kit for re-silvering is our Mini Silver Kit. This is our "bare bones' kit that includes just the essential products for making a mirror. The chemicals in this kit cover 8 square feet. Note: you will need more chemicals than you have square feet so that you are able to practice and have room for error. Just like any new skills, mirroring takes practice. You can always add on individual sets of Silvering Chemicals to any of our kits.
If your mirror is larger, is not flat or is intended to be a first surface mirror we recommend our Pump Spray Silver Kit. We have included below some of our other kits for you to consider.
To re-silver you must first remove
If you would like to re-silver your mirror you need to first be able to remove the original silvering. This means you will need to remove the mirror from the wall/frame that is currently holding it. We always recommend that you take care of this step first as unfortunately there are those situations where either the glass cannot be removed from the frame or it breaks in the process. Re-silvering cannot fix scratches or cracks in the glass.
Once your mirror is free of the frame you will need to remove the original silvering as well as backing paint. Our Mirror Back Removal Kit includes all of the items you will need for this process. Multi-Strip is an effective and environmentally-friendly paint stripper. All silver mirrors have a backing paint to protect the very thin layer of silver. Once the mirror layer is exposed you can use our Mirror Remover to chemically dissolve the mirror layer. Mirror Remover works on silver mirrors and silver mirrors backed with copper (the most common type of antique mirror).
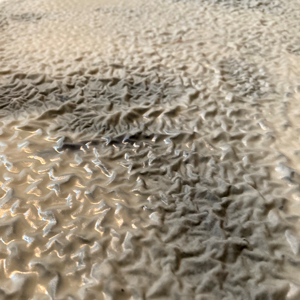
This picture shows how Multi-Strip acts on the backing paint to lift it off. You can see the gray paint below the cream colored Multi-Strip is fully loose and bubbled up.
Re-silvering one small section of a mirror
Before you decide to re-silver just one section of an old mirror, check to see if the backing paint is strong, smooth and very firmly attached to the glass. Pouring or spraying silvering chemicals onto fragile backing paint will probably lift it off and make the problem worse.
Even if the backing paint is in excellent condition, and you are able to remove just enough of it to silver one section of the mirror, there will be a fine gray line between the old silver and the new silver. Only you can decide it this is a problem. Of course, if you try this and decide that the result was not what you wanted, you can always strip the entire mirror and re-silver it. Silvering does not change the glass – you can re-silver a piece as many times as you like if you remove all of the old paint and silver first.
Polish the affected area with a paste of distilled water and pumice to smooth the edges of the surrounding backing paint and silver. Follow our Mini Silver Kit Instructions to clean, tin and silver the scratch. You can always add a second layer of silver if you think the first layer is not thick enough. Once the silver is dry, protect it with the paint in the Mini Silver Kit.
Mirror scratch repair paint
The paint that is sold to repair scratches in mirrors is made of extremely small flakes of aluminum. If you paint it on the mirror and view it from one angle, it looks perfect. If you view it from another angle it looks like a bright white line. The flakes of aluminum do not reflect light in the same way that individual silver crystals do when the crystals have formed on the glass during the silver mirroring process.